📋 Container House Planning Checklist: Your Step-by-Step Guide
This checklist is designed to ensure you cover every essential detail, from initial concept to final compliance, turning your container house design dream into a certified reality.
Phase 1: Conceptualization and Budgeting (The “Define It” Stage)
This phase is about defining your vision and ensuring it aligns with your financial and geographical realities.
| Status | Task | Key Details / Goal |
| $\square$ | Define Core Priorities | Decide: Is your main priority Budget (simple design), Timeline (pre-fab modules), or Design (complex, custom layout)? |
| $\square$ | Determine Container Count/Size | Calculate required square footage (e.g., one 40-ft High Cube = $\approx$ 320 sq ft). High Cube (9’6″ height) is strongly recommended over standard (8’6″). |
| $\square$ | Secure Land/Site | Confirm land ownership. Ensure the site is accessible for heavy equipment (crane, tilt-bed truck) and utility connections (water, sewer/septic, electricity). |
| $\square$ | Establish a Realistic Budget | Create a detailed spreadsheet factoring in land, containers, modifications, professional fees (architect/engineer), foundation, utilities, and a 15–20% contingency fund. |
| $\square$ | Initial Zoning Check | Contact your local Planning/Zoning department. Ask: Are container homes allowed for residential use? Are there aesthetic/setback restrictions? |
Phase 2: Design and Professional Consultation (The “Plan It” Stage)
Never begin modifying steel without engineer-stamped plans. This stage is crucial for safety and permitting.
| Status | Task | Key Details / Goal |
| $\square$ | Hire an Experienced Architect/Engineer | Select a professional with prior experience in modular or steel/cargo architecture. They understand structural load paths and reinforcement needs. |
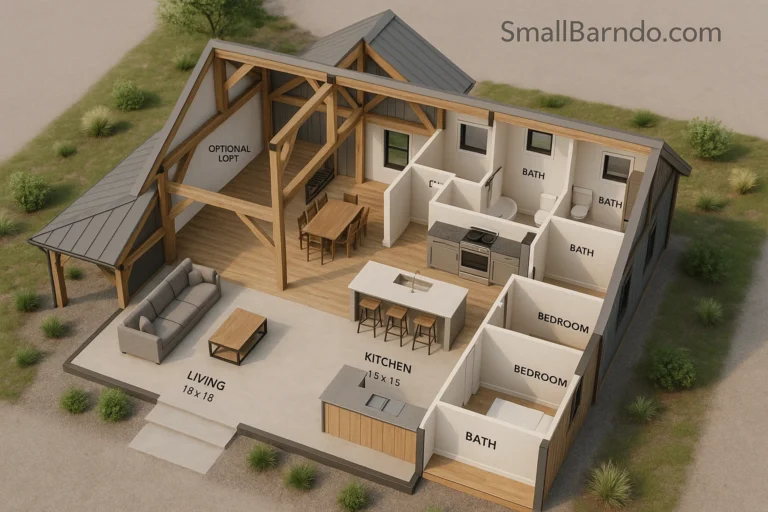
| $\square$ | Finalize Floor Plans & Layout | Determine placement of all major openings (windows, doors, container connections). Plan for interior walls, maximizing natural light and cross-ventilation. |
| $\square$ | Develop Structural Reinforcement Plan | Engineer must specify all steel beams/headers needed around cut-outs to maintain structural integrity, especially for stacked or cantilevered designs. |
| $\square$ | Specify Utility & Insulation Systems | Detail HVAC (Mini-splits are common), plumbing, and electrical routing. Choose high-R-value insulation (e.g., closed-cell spray foam) and a vapor barrier to prevent condensation. |
| $\square$ | Submit for Permits | Submit final, engineer-stamped architectural and structural plans to the local building department. Acquire Building, Electrical, and Plumbing Permits. |
Phase 3: Container Sourcing and Site Preparation (The “Acquire It” Stage)
The quality of your container directly affects your budget and timeline. Be rigorous in your selection.
| Status | Task | Key Details / Goal |
| $\square$ | Select Container Grade | Best: One-Trip or New (less damage, no prior cargo/chemical exposure). Cheapest: WWT (Wind and Watertight) (ensure no daylight visible inside, minimal rust/dents). AVOID: As-Is or containers with major floor/roof holes. |
| $\square$ | Vetting/Inspection | If buying used, request the cargo history to check for hazardous materials transport. Visually inspect for floor damage, deep rust, and chemical odors (pesticides like TBT). |
| $\square$ | Arrange Site Clearing & Grading | Clear debris/vegetation. Ensure the site is level and ready for foundation work. |
| $\square$ | Construct the Foundation | Install the approved foundation (e.g., concrete piers/footings, slab, or strip foundation) as specified by the engineer. Ensure it is perfectly level. |
| $\square$ | Plan Delivery Logistics | Confirm access for the crane/truck. Note the required clearance space (a 40-ft container requires roughly 100-110 feet of straight-line access for delivery). |
Phase 4: Construction and Finishing (The “Build It” Stage)
This is where the vision comes to life, requiring specific steel modification skills.
| Status | Task | Key Details / Goal |
| $\square$ | Container Placement & Anchoring | Use a crane to set containers precisely onto the foundation. Weld or bolt containers to the foundation and to each other (for multi-unit homes). |
| $\square$ | Cutting and Reinforcement | Cut all door, window, and utility openings. Immediately weld the pre-fabricated steel reinforcements/headers into place as specified in the plans. |
| $\square$ | Cleaning and Treating | Thoroughly clean the interior (especially the floor). Apply anti-corrosion primer to all cut edges and exposed steel. |
| $\square$ | Insulation and Vapor Barrier | Apply the chosen insulation (e.g., spray foam) to the interior walls, ceiling, and potentially the floor. Ensure a complete vapor barrier seal. |
| $\square$ | Utilities Rough-In & Inspection | Install rough plumbing and electrical systems before interior framing. Pass the mandatory Plumbing and Electrical Rough-In Inspections. |
| $\square$ | Interior Framing and Drywall | Build interior stud walls (for running utilities/attaching drywall). Install drywall, flooring, windows, and doors. |
| $\square$ | Exterior Cladding/Roof | Install any exterior cladding (wood, siding) and a secondary pitched roof (recommended for drainage and added insulation). |
Phase 5: Final Compliance and Move-In (The “Certify It” Stage)
The last critical hurdle is getting official approval to inhabit your new dwelling.
| Status | Task | Key Details / Goal |
| $\square$ | Final Building Inspections | Schedule the final inspections (e.g., structural, fire safety, and final building inspection). Address any “punch list” items immediately. |
| $\square$ | Obtain Certificate of Occupancy (C of O) | This document is issued by the building department and legally grants you permission to live in the structure. Do not move in without it. |
| $\square$ | Secure Insurance | Obtain homeowner’s insurance (often classified as “Modular Home” or “Non-Standard Construction”). |
| $\square$ | Move-In & Enjoy! | Celebrate the successful completion of your innovative container house design project! |
🎁 Your Free Guide to Innovative Container House Design
To start your journey with the best foundation, focus on the initial four critical decisions:
- High Cube Over Standard: Always opt for the 9’6″ High Cube container. Once you frame and insulate the interior, you lose 6-8 inches of height. That extra foot makes a monumental difference in livability and ceiling height perception.
- Professional Pre-Vetting: For used containers, use a trusted broker who can certify the Wind and Watertight (WWT) grade and ideally provide a Clean Cargo history. An initial investment in a better container saves thousands in rust removal and interior remediation later.
- The Reinforcement Rule: Every single time you cut a hole in the steel wall (for a window, door, or linking two containers), you must weld a steel frame (header) back in place. The container’s strength lies in its uncompromised shell. This reinforcement is non-negotiable for structural integrity.
- Embrace Spray Foam: Though it’s a higher upfront cost, closed-cell spray foam insulation is the superior choice for a steel box. It adheres directly to the metal, acts as an excellent thermal break, and provides a necessary vapor barrier, preventing condensation and internal rust.